This year we had so much Halloween candy that the kids still haven't finished it. But then again we still have some Easter candy....
A friend recently told just to let them pig out for a day or two and then they won't want anymore. I sure don't know what to think about that philosophy! Anybody else tried it?
Now it's time to think about stockings and every year I buy special candy to go inside. And every year we still have Christmas candy come Spring. Well not this year!
This year I am not buying ANY Christmas candy!!! I know what you're thinking; those poor mistreated kiddos. HA! Not a chance!
I am making all homemade treats and a few toys for their stockings this year. And trust me these are simple to put together, because if they weren't, I wouldn't be doing it.
#1 - Turtles
These are the perfect combination of sweet & salty, chewy and crunchy!
Ingredients:
Small pretzels in shape of circle, square or regular
Rolos
Pecans
Place pretzels on cookie sheet- can be lined w/ parchment paper for quick cleanup.
Place a rolo on each pretzel. Melt in over at 350* for about 3 minutes, don't go to long or you'll have a mess!
Remove from oven and quickly press 1 pecan into each slightly melted rolo.
Chill (or in my case, put it out in the garage where it's refrigerator temp already)
Enjoy!!
I will be putting these in some cute holiday bags I got from the dollar store.
These don't last long in my house; I make sure to hide a batch so that they last till Christmas!!
#2 - Hot Chocolate Stir Sticks
My kiddos LOVE marshmallows in their hot chocolate so this is bound to be a hit!
Ingredients:
Mashmallows
Chocolate chips
Candy canes or peppermints, crushed
Coffee straws or craft sticks
Here is a great tutorial on how to make these!
#3 - Popcorn Balls
These are a yearly tradition in my mom's house! She used to make these for all our friends and neighbors at Christmas time. I am hoping to carry on that tradition this year with my little ones!
Ingredients:
Approx. 9 cups Air popped popcorn - this is my popper
1/2 cup Jello (small box) - my favorites are Lime and Cherry
1/2 cup sugar
1/2 cup white Karo syrup
1/2 cup water
1/4 cup butter
In microwave safe bowl (a large one) boil to soft stage, about 7 min. Stir every couple minutes. You may want a lid as this can sometimes bubble up over the edge.
Mix with popcorn. Rub some butter on hands, work popcorn into balls. Be careful, mixture is hot!
Wrap in plastic or sandwich bags to store.
#4 - Chex Mix
I make just the regular ol Chex Mix! It is my family's all-time favorite.
Ingredients:
3 cups each - rice, corn, wheat chex
1 cup nuts, whatever you like. I used dry roasted peanuts
1 cup bite-sized pretzels or sticks
6 T butter
2 T Worcestershire sauce
1 1/2 tsp seasoned salt (optional) I don't put this in anymore and it's still quite tasty
3/4 tsp garlic powder
1/2 tsp onion powder
Heat oven to 250*; melt butter in large roasting pan. Stir in seasonings and sauce. Add chex, nuts and pretzels. Stir until coated. Heat in oven 45 min- stirring every 15min. Cool on paper towels; store in airtight container.
Variations to this recipe are endless! Put in whatever sounds good to you! There are also recipes for sweet mixes such as Muddy Buddies and Peppermint Puppy Chow.
#5 - Peppermint Pretzels
These could be made with white or dark chocolate - I plan on doing some of both!
Dark Chocolate recipe
White Chocolate recipe
And these will be wrapped up in those decorative treat bags from the dollar store too!
#6 - Candy Cane Reindeer
Just a candy cane and a few crafting supplies and you've got yourself a treat that doubles as a toy! And just think how adorable these little guys will look peeking out of the stockings!
This one is super simple!
Check it out here.
#7 - Clothes Pin Airplane or Butterfly
Now, obviously this one isn't a treat but rather a fun homemade toy that kids could help make or even use as an ornament on the tree.
These may seem a little more time consuming but the look on a kids face when they receive this gift is so worth it! And they really don't take that long to make!
Airplane Tutorial
Butterfly Tutorial
And here's another one - An Ant! So many possibilities!
Another easy idea is to double (or triple!) each recipe of these treats and fix up a little plate for friends and family! Enjoy!
Happy Holidays!
MadCounty Mama
Showing posts with label recipe. Show all posts
Showing posts with label recipe. Show all posts
Monday, December 3, 2012

Monday, August 13, 2012
Menu Monday
I am slowly working my way back to a monthly menu- so starting in September I will be posting once (hopefully!) at the beginning of the month. And I'll be sharing some tips on how you can plan for a month of meals too without going to the grocery store every week.
Tip #1 - Stock your pantry when items, you frequently use, are on sale!
Tip #2 - Take a monthly inventory of your pantry/freezer each month before you meal plan.
Stay tuned for more tips next time!
Weekly Menu:
Monday:
Breakfast - Oatmeal & Strawberries
Lunch - Grilled Cheese, Ants on a Log
Dinner - Spaghetti, Garlic bread, fresh greens
Tuesday:
Breakfast -Scrambled eggs w/ cheese & toast
Lunch- Lunchables
Dinner -Soup & Salad
Wednesday:
Breakfast -Smoothies & Zucchini bread
Lunch- PB&J, goldfish, carrots
Dinner -Ham&Kholrabi gratin, broccoli salad
Thursday:
Breakfast -Cold cereal, fruit & yogurt
Lunch- Leftovers
Dinner -Grilled Trout, 4-bean salad
Friday:
Breakfast -Whole wheat Waffles & bacon
Lunch- Chicken wraps, veggies & fruit
Dinner - BBQ chicken pitas, green salad
Saturday:
Breakfast -Homemade Granola bar & fruit
Lunch- Cook's choice
Dinner - Pizza
Sunday:
Breakfast -Cold cereal w/ muffin
Lunch- Chef Salad
Dinner - BBQ w/ friends
Cheers!
MadCounty Mama
Tip #1 - Stock your pantry when items, you frequently use, are on sale!
Tip #2 - Take a monthly inventory of your pantry/freezer each month before you meal plan.
Stay tuned for more tips next time!
Weekly Menu:
Monday:
Breakfast - Oatmeal & Strawberries
Lunch - Grilled Cheese, Ants on a Log
Dinner - Spaghetti, Garlic bread, fresh greens
Tuesday:
Breakfast -Scrambled eggs w/ cheese & toast
Lunch- Lunchables
Dinner -Soup & Salad
Wednesday:
Breakfast -Smoothies & Zucchini bread
Lunch- PB&J, goldfish, carrots
Dinner -Ham&Kholrabi gratin, broccoli salad
Thursday:
Breakfast -Cold cereal, fruit & yogurt
Lunch- Leftovers
Dinner -Grilled Trout, 4-bean salad
Friday:
Breakfast -Whole wheat Waffles & bacon
Lunch- Chicken wraps, veggies & fruit
Dinner - BBQ chicken pitas, green salad
Saturday:
Breakfast -Homemade Granola bar & fruit
Lunch- Cook's choice
Dinner - Pizza
Sunday:
Breakfast -Cold cereal w/ muffin
Lunch- Chef Salad
Dinner - BBQ w/ friends
Cheers!
MadCounty Mama
Thursday, August 9, 2012
Chocolate Peanut Butter Shake - Healthy!
This shake is so good and guilt-free! Also gluten-free; can be dairy free, just use almond or coconut milk. Try it, you will be amazed!

Chocolate Peanut Butter Shake
2 bananas, diced and frozen
1 Tbl cocoa powder
1-2 Tbl peanut butter (depends on how much you love PB)
3/4 cup milk +/- on your preference of consistency
vanilla
Place bananas in blender with cocoa, peanut butter and milk. Blend till smooth. Stir in vanilla.
Technically 2 servings but some days you just want it all!
Enjoy!

MadCounty Mama
Tuesday, August 7, 2012
Menu Monday
Yesterday was a bit crazy :) in a good yet exhausting way. Hope to have pictures up soon of the new addition to our family!
This week's Menu...
Monday:
Breakfast- "on the go" cheese stick and granola bars
Lunch - PB & J w/ goldfish and fruit
Dinner - Lettuce wraps - these were amazing! Will be posting a recipe soon!
Tuesday:
Breakfast - Yogurt & whole wheat apple scone
Lunch - Watermelon/canteloupe, broccoli/cucumber, Ants on an Island (recipe to follow!)
Dinner - Chicken waldorf salad
Wednesday:
Breakfast - cheerios & smoothie
Lunch - Homemade mac 'n' cheese, carrot sticks
Dinner - BBQ pork steaks, grilled summer squash
Thursday:
Breakfast - Cream of wheat
Lunch - Egg salad sandwich, veggies
Dinner - Ham & Veggie primivera
Friday:
Breakfast - Eggs & toast
Lunch - Leftovers
Dinner - Leftovers :)
Saturday:
Family Reunion!
I'm making Frog Eye Salad, Calico Beans and Rhubarb Crisp
Happy Cooking!
MadCounty Mama
This week's Menu...
Monday:
Breakfast- "on the go" cheese stick and granola bars
Lunch - PB & J w/ goldfish and fruit
Dinner - Lettuce wraps - these were amazing! Will be posting a recipe soon!
Tuesday:
Breakfast - Yogurt & whole wheat apple scone
Lunch - Watermelon/canteloupe, broccoli/cucumber, Ants on an Island (recipe to follow!)
Dinner - Chicken waldorf salad
Wednesday:
Breakfast - cheerios & smoothie
Lunch - Homemade mac 'n' cheese, carrot sticks
Dinner - BBQ pork steaks, grilled summer squash
Thursday:
Breakfast - Cream of wheat
Lunch - Egg salad sandwich, veggies
Dinner - Ham & Veggie primivera
Friday:
Breakfast - Eggs & toast
Lunch - Leftovers
Dinner - Leftovers :)
Saturday:
Family Reunion!
I'm making Frog Eye Salad, Calico Beans and Rhubarb Crisp
Happy Cooking!
Friday, August 3, 2012
Homemade Granola Bars
These homemade granola bars are so yummy! Kids and adults love 'em! You can easily change the recipe to try different flavors. So far we've tried crispy chocolate and chocolate peanut butter. Next I want to try oatmeal raisin; I also have ideas for an orange/cranberry or a white chocolate/cranberry.
The original recipe came from here - she has lots of other great recipes as well.
I changed up my version slightly, combining two recipes, to satisfy our family's tastes.
Chocolate PB Granola Bars
1/2 cup natural peanut butter
1/3 cup local honey
1/4 cup coconut oil
2 cups rolled oats
1 cup rice Krispies
1/2 cup chocolate chips
1 tsp vanilla
Melt peanut butter, honey and coconut oil in saucepan over medium heat. Heat till slightly bubbly, stirring constantly. Remove from heat; let cool 2-3 minutes. Stir in vanilla.
Combine oats and rice Krispies in large bowl; pour melted mixture over and mix thoroughly. (Here you can throw some chocolate chips in or wait and put all on top.)
Press into foil line 8x8 pan; press down firmly to pack it in. Sprinkle chocolate chips on top and press down again. Let cool (I toss mine in the fridge for an hour or so)
Turn pan upside onto cutting area, it should fall out. Then cut into bars. Store in airtight container. These don't last more than 2 days around here!

Notes -
Some of the bar recipes on Marathon Mom call for butter, I have found that butter seems to make the bars extra crumbly and oily so I prefer the coconut oil.
I never seem to have wheat germ or flax seed on hand so I leave those out (in original recipes from Marathon Mom)
I get 8-10 bars out of a pan depending on how you cut them. With 3 little ones that is at least 3 snacks per child.
Add-ins: M&Ms, peanuts, coconut, sunflower seeds, Craisins
Enjoy!
MadCounty Mama
Friday, April 13, 2012
Frozen Mocha Dessert
This dessert is rich, creamy and yet delicate. It is so easy to make and I just love peoples' reaction after that first bite! The recipe comes from my high school home economics teacher - we made this dessert for many school functions.
Frozen Mocha Dessert
1 1/2 cups Oreo crumbs
3/4 cup chopped pecans, divided
1/2 cup butter, melted
2 tsp instant coffee
1 T hot water
2-8oz pkg cream cheese
1-14 oz can sweetened condensed milk
1/2 cup chocolate syrup
1 - 8oz tub cool whip or whipped cream
Combine crumbs, 1/2 cup pecans and butter; pat into 13x9 pan.

Dissolve instant coffee in hot water, set aside.
Beat cream cheese till light and fluffy; blend in coffee, sweetened condensed milk and chocolate syrup.

Fold in whipped cream and spread over crust. Sprinkle with remaining pecans and freeze.

Remove from freezer 10-15 min before cutting.

And always have a helper!

MadCounty Mama
Frozen Mocha Dessert
1 1/2 cups Oreo crumbs
3/4 cup chopped pecans, divided
1/2 cup butter, melted
2 tsp instant coffee
1 T hot water
2-8oz pkg cream cheese
1-14 oz can sweetened condensed milk
1/2 cup chocolate syrup
1 - 8oz tub cool whip or whipped cream
Combine crumbs, 1/2 cup pecans and butter; pat into 13x9 pan.

Dissolve instant coffee in hot water, set aside.
Beat cream cheese till light and fluffy; blend in coffee, sweetened condensed milk and chocolate syrup.

Fold in whipped cream and spread over crust. Sprinkle with remaining pecans and freeze.

Remove from freezer 10-15 min before cutting.

And always have a helper!

MadCounty Mama
Wednesday, April 4, 2012
Homemade Ranch Dressing
I found a similar recipe and then adjusted it to fit my needs. I use my Tastefully Simple products because they are the best!
Homemade Ranch Dressing
3/4 cup mayonnaise
1/2 cup buttermilk
1/2 Tbsp Onion Onion™
1/2 Tbsp Spinach & Herb Dip Mix
1/2 Tbsp Garlic Garlic™
Whisk all ingredients together and chill for 2 hours before serving. Makes 1 1/4 cups.
 Great for dipping fresh veggies or on a baked potato!
Enjoy!
MadCounty Mama
Homemade Ranch Dressing
3/4 cup mayonnaise
1/2 cup buttermilk
1/2 Tbsp Onion Onion™
1/2 Tbsp Spinach & Herb Dip Mix
1/2 Tbsp Garlic Garlic™
Whisk all ingredients together and chill for 2 hours before serving. Makes 1 1/4 cups.

Enjoy!
MadCounty Mama
Tuesday, March 6, 2012
Chicken Cordon Bleu
This recipe for Chicken Cordon Bleu is simple yet makes dinner feel special! I made this for Valentine's Day this year and everyone in my family liked it. I like to serve it with steamed broccoli or Caesar salad and rolls.
Ingredients:
4 chicken breasts
8 slices Swiss cheese
2 sliced deli style ham
1 can cream of chicken soup
1/2 cup milk
Salt and pepper
Pound out chicken breasts between to pieces of wax paper.
Place 1 slice cheese and 1 slice ham on each.
Roll up and secure with toothpick(s).
Place in greased baking dish.

Mix soup and milk together; pour over chicken.

Bake at 350* for 30 min. Top with remaining Swiss cheese and back 3-5 min until cheese melts.

Remove toothpicks before eating!

MadCounty Mama
Ingredients:
4 chicken breasts
8 slices Swiss cheese
2 sliced deli style ham
1 can cream of chicken soup
1/2 cup milk
Salt and pepper
Pound out chicken breasts between to pieces of wax paper.
Place 1 slice cheese and 1 slice ham on each.
 |
| (I used 2 cheese slices b/c the meat was so big) |
Roll up and secure with toothpick(s).
Place in greased baking dish.

Mix soup and milk together; pour over chicken.

Bake at 350* for 30 min. Top with remaining Swiss cheese and back 3-5 min until cheese melts.

Remove toothpicks before eating!

Saturday, December 31, 2011
Crescent Rolls
This recipe makes a tender and light roll and it really quite simple. This is the recipe I started with when I learned how to make bread/rolls. I hardly ever use any other recipe!
Crescent Rolls
2 Tbl yeast
1/2 cup warm water
1 cup milk
1/2 cup butter
1/2 cup honey
2 cups whole wheat flour
3 eggs
3 cups white flour
Place yeast in mixing bowl; add warm water, let dissolve.
Scald milk in sauce pan, remove from heat.
Add butter and honey to milk, stir to melt and then allow to cool some.
Mix yeast with milk mixture.
Add Whole wheat flour one cup at a time, mixing after each addition.
Add eggs-mix well.
Add white flour one cup at a time, mix until doughy.
Turn out onto a floured surface and knead 6-8 times, into a ball. Place in greased bowl, then flip to get both sides greased. Let rise 1 hour-I turn my oven on to warm and place bowl on top of stove with a cheese cloth over top. Punch down, split dough into too balls, roll out, one at a time, into circle. Cut like a pizza into triangles (I use a pizza wheel, just roll it lightly as to not cut your counter top!)

Brush with melted butter; roll up.

Be sure to tuck the "tail" underneath and place on baking sheet about 2 inches apart; let rise till doubled- 1/2 hr or so.

Bake at 350* for 9-12 min. Check bottoms b/c they brown much quicker than tops.
Also pictured: Pumpkin Pie and Gluten Free Lemon Meringue
Happy Baking!
MadCounty Mama
Crescent Rolls
2 Tbl yeast
1/2 cup warm water
1 cup milk
1/2 cup butter
1/2 cup honey
2 cups whole wheat flour
3 eggs
3 cups white flour
Place yeast in mixing bowl; add warm water, let dissolve.
Scald milk in sauce pan, remove from heat.
Add butter and honey to milk, stir to melt and then allow to cool some.
Mix yeast with milk mixture.
Add Whole wheat flour one cup at a time, mixing after each addition.
Add eggs-mix well.
Add white flour one cup at a time, mix until doughy.
Turn out onto a floured surface and knead 6-8 times, into a ball. Place in greased bowl, then flip to get both sides greased. Let rise 1 hour-I turn my oven on to warm and place bowl on top of stove with a cheese cloth over top. Punch down, split dough into too balls, roll out, one at a time, into circle. Cut like a pizza into triangles (I use a pizza wheel, just roll it lightly as to not cut your counter top!)

Brush with melted butter; roll up.

Be sure to tuck the "tail" underneath and place on baking sheet about 2 inches apart; let rise till doubled- 1/2 hr or so.

Bake at 350* for 9-12 min. Check bottoms b/c they brown much quicker than tops.
 |
| Thanksgiving 2011 |
Happy Baking!
MadCounty Mama
Saturday, November 26, 2011
In everything, Give Thanks
We've been busy at Donaldson Academy! =) We've been learning all about the Pilgrims and the history of Thanksgiving. Before our first child was born, PreacherMan and I were in Massachusetts for a family visit; we had the opportunity to go to the Plimouth Plantation. It is a living history museum in Plymouth, MA. It was such a fun and educational experience - we hope to take our whole family sometime. But in the mean time we did our hands-on learning at home with lots of crafts, a story about a Pilgrim boy and a "cooking" activity.
First we talked about what we are thankful for:


A Thanksgiving themed cut 'n' paste pattern worksheet:

And then we made Pilgrim Hats!
Ingredients:
Fudge Stripe Cookies
White Frosting
Peanut Butter Cups
Something small and orange...We used the tips of Candy Corn!
 Unwrap peanut butter cups, then frost the wide end with frosting:
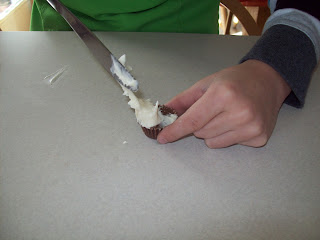 Turn upside down and press onto 1 cookie:
 Add a "buckle":
 And Viola! A Pilgrim Hat!
 One of the helpers was much more interested in eating the supplies...
 Our special treats that we shared with our Bible study group.
 Hope you all had a wonderful Thanksgiving!
MadCounty Mama
First we talked about what we are thankful for:

Wylie's List:
* Meat
* My name, Wylie
* Wyatt
* Dad
* Mom
* Milk
* Evelyn
Wyatt's List:
*Motorcycles
*Mater
*Gram&Gramps
*The numbers 1,2,3,4
*My Bible Book
*My brother and sister
Then we put together a Cornucopia with stickers:


And then we made Pilgrim Hats!
Ingredients:
Fudge Stripe Cookies
White Frosting
Peanut Butter Cups
Something small and orange...We used the tips of Candy Corn!


MadCounty Mama
Monday, October 31, 2011
Lasagna
When I prepare this I make a double batch and freeze the extra one for an easy go-to meal. I use the deep loaf pans b/c that is what works best for my family - and the clean-up is a breeze.
2 lbs ground beef
1 package lasagna noodles
1 jar spaghetti sauce or 2 cans tomato sauce
1 can diced tomatoes
1 xlarge container of ricotta
1 egg
2-3 cups shredded mozzarella/cheddar
parsley
Italian seasoning
onion and garlic powder
Boil noodles till tender, drain and set aside.
Brown meat with onion, garlic and a couple shakes of Italian seasoning. Drain. Then stir in tomato sauce and diced tomatoes.
In separate bowl stir together ricotta, some parsley, Italian seasoning and egg.
Spray pan with oil.
Start with meat mixture in bottom, then noodles, then ricotta. (Remember to ration your mixtures in order to make a 2nd dish.)

Repeat layers ending with meat.

Top with shredded cheese.
 Repeat with 2nd pan.
I usually do about 3 layers per pan.
Bake at 350* for 45min or until bubbly *OR*
Cover tightly with plastic wrap then aluminum foil and freeze.
I bake straight from the freezer. Place on cookie sheet in cold oven. Turn on and cook for approximately 2 1/2 hrs at 350*
Let set 10 min before cutting.
Serve with crusty bread and a salad or green beans.
Enjoy!
MadCounty Mama
2 lbs ground beef
1 package lasagna noodles
1 jar spaghetti sauce or 2 cans tomato sauce
1 can diced tomatoes
1 xlarge container of ricotta
1 egg
2-3 cups shredded mozzarella/cheddar
parsley
Italian seasoning
onion and garlic powder
Boil noodles till tender, drain and set aside.
Brown meat with onion, garlic and a couple shakes of Italian seasoning. Drain. Then stir in tomato sauce and diced tomatoes.
In separate bowl stir together ricotta, some parsley, Italian seasoning and egg.
Spray pan with oil.
Start with meat mixture in bottom, then noodles, then ricotta. (Remember to ration your mixtures in order to make a 2nd dish.)

Repeat layers ending with meat.

Top with shredded cheese.

I usually do about 3 layers per pan.
Bake at 350* for 45min or until bubbly *OR*
Cover tightly with plastic wrap then aluminum foil and freeze.
I bake straight from the freezer. Place on cookie sheet in cold oven. Turn on and cook for approximately 2 1/2 hrs at 350*
Let set 10 min before cutting.
Serve with crusty bread and a salad or green beans.
Enjoy!
MadCounty Mama
Sunday, October 16, 2011
Shredded Beef Enchiladas
Summer weather has gone away and the chilly Fall days are upon us. It is time once again to heat up my oven and enjoy some comfort food! These enchiladas require some amount of prep but I cook enough to make two batches. One for dinner and one for the freezer!
First, cook a roast in crock pot either on high for 4 hours or low for 8 hours until meat is tender enough to shred. I put 2-3 cups water and 1/2 cup taco seasoning in with it. When done shred meat and simmer on stove top with a little extra broth for about 10 min.
 Next you will need:
Tortilla shells - I made 8 enchiladas per 9x13in pan.
Shredded cheddar cheese - about 3 cups; 1 1/2 cups per pan
One XL can (29.2oz) enchilada sauce
One can cream of mushroom soup
Cooking spray - coat each pan evenly
Two 9x13 pans - I use aluminum foil pans.
Mix together 1/2 can enchilada sauce, cream of mushroom soup and meat in bowl. Spoon onto tortilla about 1/3 cup to 1/2 cup each.

Begin rolling tortilla by folding in sides. Then roll from unfolded side.
 Continue to roll until closed. Place in greased pan, seam side down and repeat with remaining tortillas and filling.
 When pan is full, pour 1/2 of remaining enchilada sauce on top and sprinkle with cheese. Remember to split remaining sauce and cheese between both pans. Bake at 375* for 30 min or until cheese is melted and sauce is bubbly.
*If freezing cover tightly with plastic wrap and then with tin foil. Use within 3 months.
ENJOY!!!
MadCounty Mama
First, cook a roast in crock pot either on high for 4 hours or low for 8 hours until meat is tender enough to shred. I put 2-3 cups water and 1/2 cup taco seasoning in with it. When done shred meat and simmer on stove top with a little extra broth for about 10 min.

Tortilla shells - I made 8 enchiladas per 9x13in pan.
Shredded cheddar cheese - about 3 cups; 1 1/2 cups per pan
One XL can (29.2oz) enchilada sauce
One can cream of mushroom soup
Cooking spray - coat each pan evenly
Two 9x13 pans - I use aluminum foil pans.
Mix together 1/2 can enchilada sauce, cream of mushroom soup and meat in bowl. Spoon onto tortilla about 1/3 cup to 1/2 cup each.

Begin rolling tortilla by folding in sides. Then roll from unfolded side.


*If freezing cover tightly with plastic wrap and then with tin foil. Use within 3 months.
ENJOY!!!
MadCounty Mama
Thursday, September 29, 2011
Our Little Cupcake's 1!
Princess turned 1 last week! Because she's so sweet and cute I went with a cupcake theme. There is a lot of cupcake STUFF out there, but I decided against going all out and limited myself to just buying a giant cupcake pan. I also found an excellent recipe for homemade Fun-Fetti Cupcakes! But first some party pics:
Her favorites were obviously the wrapping paper and the dolls. It is incredibly fun to watch her learn and grow. We are very thankful that God blessed us with our sweet baby girl!
And Now, the recipe for the Fabulous FunFetti Cupcakes!!!
MadCounty Mama
 |
| Little Cowgirl say CHEESE! |
 |
| Giant Chocolate Pound Cake cupcake and homemade FunFetti Cupcakes |
 |
| What's this?!?! |
 | ||
| All Done! |
 |
| Crinkly Paper! |
 |
| A baby doll |
 |
| More paper! |
 |
| And baby Stella |
And Now, the recipe for the Fabulous FunFetti Cupcakes!!!
FunFetti Cupcakes
Ingredients:
1 1/4 cups flour
1 1/2 tsp baking powder
1/4 tsp salt
3/4 cup sugar
6 T butter, room temperature
1 large egg + 1 egg white, room temperature
1 tsp vanilla extract
1/2 cup milk
2 T rainbow sprinkles
Directions:
1. Preheat oven to 350*F.
2. Line cupcake pan with paper liners.
3. In a large bowl, sift flour, baking powder and salt. Set aside. In a stand mixer, fitted with flat beater, beat the sugar and butter until well combined, about 2-3 minutes.
4. Add egg and egg white, one at a time, beating on low. Add vanilla. Gradually add flour mixture in three additions, alternating with milk, end with flour.
5. Fold in sprinkles. Fill cupcake liners about 1/2-2/3 full.
6. Bake for 17-20 min or until a toothpick inserted in the middle comes out clean. Remove from pan and cool completely on wire racking before frosting.
 |
| A little Spice helper |
 |
| Yummy cups |
Tuesday, June 21, 2011
Strawberry Rhubarb Pie
Mmmm this is one of my favorite pies! I use fresh homegrown rhubarb and frozen Costco strawberries! It is really easy to whip this together and impress your guests or just enjoy with your family. You can adjust the sugar amount to fit your own tastes, mine comes out on the tart side but not too tart.
Strawberry Rhubarb Pie
1 double pie crust (see recipe below)
2 eggs beaten
1 cup sugar
1 T flour
3 cups rhubarb
2 cups sliced strawberries
Roll out pie crust and put bottom layer into pie plate.
*TIP* When picking up your crust; fold it in half like a
half circle, then in half again like a triangle. This makes
it easier to pick up and place in pie plate with out breaking.
Mix together sugar and flour; stir in rhubarb and strawberries.
Add egg, mix. Pour into prepared pie crust.

Cover with top crust; seal and flute edges. Cut small slits into top of pie.
Bake at 350* for 35-45 min or more if needed.

Never-Fail Pie Crust ~ Taste of Home
Enjoy with ice cream or cream. It is Delish!
MadCounty Mama
Strawberry Rhubarb Pie
1 double pie crust (see recipe below)
2 eggs beaten
1 cup sugar
1 T flour
3 cups rhubarb
2 cups sliced strawberries
Roll out pie crust and put bottom layer into pie plate.
*TIP* When picking up your crust; fold it in half like a
half circle, then in half again like a triangle. This makes
it easier to pick up and place in pie plate with out breaking.
 |
| Ta Da |
Mix together sugar and flour; stir in rhubarb and strawberries.
Add egg, mix. Pour into prepared pie crust.

Cover with top crust; seal and flute edges. Cut small slits into top of pie.
Bake at 350* for 35-45 min or more if needed.

Never-Fail Pie Crust ~ Taste of Home
Enjoy with ice cream or cream. It is Delish!
MadCounty Mama
Wednesday, June 8, 2011
Mama's Banana Bread
I took my favorite banana bread recipe from Betty Crocker and turned it into something healthier. The results were awesome!
2 1/2 cups whole wheat flour
1/3 cup white sugar
1/2 cup brown sugar
3 1/2 tsp baking powder
1 tsp salt (optional)
3 Tbl applesauce (instead of oil)
1 1/2 Tbl plain yogurt
3/4 cup milk
1 egg
2-3 mashed bananas
Mix dry ingredients

and separately wet.

Mix both together till combined, do not
over mix. Pour into 1 greased loaf pan.
Bake at 350* for 45-55 min.
*NOTES*
Sometimes more milk is needed if batter
is too dry.
I made mine in 2 loaf pans by mistake so
they baked quicker and were obviously
smaller but they tasted just as great!
 As you can see the first loaf didn't last long.
Happy Cooking!!!
MadCounty Mama
2 1/2 cups whole wheat flour
1/3 cup white sugar
1/2 cup brown sugar
3 1/2 tsp baking powder
1 tsp salt (optional)
3 Tbl applesauce (instead of oil)
1 1/2 Tbl plain yogurt
3/4 cup milk
1 egg
2-3 mashed bananas
Mix dry ingredients

and separately wet.

Mix both together till combined, do not
over mix. Pour into 1 greased loaf pan.
Bake at 350* for 45-55 min.
*NOTES*
Sometimes more milk is needed if batter
is too dry.
I made mine in 2 loaf pans by mistake so
they baked quicker and were obviously
smaller but they tasted just as great!

Happy Cooking!!!
MadCounty Mama
Subscribe to:
Posts (Atom)